Text based installation
For the text based installation to be triggered unobtrusively it was necessary to use discrete technology, I considered various motion sensors compatible with the arduino. First of which was to have a pressure sensor embedded in the floor that when stepped on would trigger the installation. However it may be problematic with regards being a big enough size, it's possible that a visor would walk over it or passed it without standing on it. Another probability would be hiding it, it would need to register the footsteps but be at the same level of the floor. Another suggestion was to use a proximity sensor, however previous testing of this suggested it may be a bit temperamental especially if there are a lot of people in the museum space at once.
Then it was considered to create an infrared beam to shine across to meet an infrared sensor. Of course infrared beams are undetectable by the human eye so it seemed a good choice. The idea is that once the beam is broken (ie. someone passes through it) the interaction would then be triggered. Initial testing of this was conducted by writing a script that registered the infrared beam and once the beam was broken a yellow led would turn on. Pictured below is testing it with the infrared light of a tv remote. Later an infrared LED hooked up to the arduino was used. It was discovered that the beam would not be strong enough for the purpose of the project.

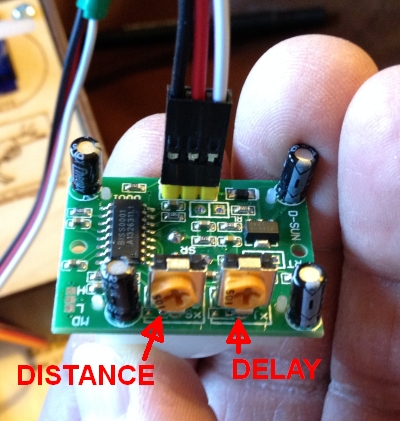
After further research online I came across a passive infrared sensor. The benefit of which is that another component wouldn't be required across the room. It wouldn't create a beam but detect an individuals motion by reading the infrared waves that radiate from them. The component itself has two variables, the sensitivity/distance and the time/delay. It took a lot of tweaking to get the desired result from this. For the purpose of the project it was calculated to the scale of the architectural model.
The program for this is written with Arduino software. It defines that pin7 is the input for the ir sensor and when triggered emits light from the leds behind the letters that create the desired words of the text.
For the purpose of the scaled model the led's and sensor are all wired to the same arduino however the use of an xbee shield for the arduino would enable the two to be separate. Aswell as a delay in the time it takes for the leds to be triggered there is also a delay in the amount of times the sensor can be read. Exmaple: the infrared sensor will not trigger the led
It is envisaged that when triggered, the letters are revealed in a gradual mode revealing the word letter by letter for the viewer(not the person who triggered the motion sensor) to see.
The video installation
For the video installation to be triggered a dial on the lantern must be turned. A rotary potentiometer was used. The potentiometer is wired to the Arduino. In the arduino platfrom the standard firmata was uploaded to the board. In processing it is programmed to change the display of the loaded videos. The projector used in the installation is a Dell 2400 MP. It is smaller than the average projector and fitted well into the housing. Had the budget being bigger for the project we would have invested in a short throw projector. To combat this problem of not having a short throw projector, we reflected the projection from a mirror back onto the book. For this reason the video content had to be reversed. After testing the projection in the housing we discovered that the brightness of the original video wasn't carried through to the projection. The image was a lot darker projected and it lost some detail. To fix this the original videos were brightened and the settings of brightness were also changed on the projector itself.
The lantern
The durability of the lantern is primary to the success of the installation. it will be interacted with the most and has a higher cance of being damaged. In the first prototype it was held in place with a cardboard structure in the base of the lantern.

It was quickly discovered that this wouldn't be sufficently strong enough. The final piece will need a more durable housing. In this previous prototype there was no dial on the potentiometer and it may have been mistaken for a button. We have now sourced dials for the potentiometers which may help this too. We spray painted the lanterns black to give them a nice even finish which proved very succesfull. I cut out the inside of both so that the LEDs can be embedded.
No comments:
Post a Comment