- What material would the map be
- How would the electrical components be waterproof
- How would the map be secured
The material for the map needs to be durable and waterproof in order to withstand the Irish weather. The first material I looked at was Perspex (or Acrylic) Sheets, however these are transparent, even white perspexs has some transparency. It does have a high resistance than glass and could withstand windy conditions.
 |
| Transparent Perspex |
 |
| White Perspex |
http://www.accessplastics.com/acrylic-perspex-sheets/
http://www.365plastics.ie/index.php/plastic-sheets/acrylic-perspex-sheets.html
Another option is High Density Polyethylene (HDPE) Sheets, a plastic produced from petroleum. The most common form of plastic and can be found in a wide range of items from plastic bags to plastic shairs. This material is corrosion resistant, non toxic and water resistant.

 |
| HDPE Sheets |
http://www.usplastic.com/catalog/item.aspx?itemid=23869
http://www.regal-plastics.com/hdpe-high-density-polyethylene-sheet.html
http://www.quadrantplastics.com/en/products/machinable-plastics/moderate-80-c/hdpe.html
Fibreglass is another option that is a robust material and is used in the housing industry, storage tanks, piping, it is even used to make surfboards. It is lightweight but durable. There are two types of Fibreglass. E-glass, which is Electrical Glass. The other is S-glass, which is structural glass and 30% stronger. Like the Perspex, fibreglass is also transparent, but Fibreglass Honeycomb panels are not.
 |
| Fibreglass Sheet |
 |
| Fibreglass Honeycomb Panel |
https://www.acpsales.com/Fiberglass.html
http://www.glastic.com/en/products/glastic-electrical-products/flat-sheet-laminate.html
For creating the outlines of the countries we would use the same material as the map, but in a different, darker colour. I also looked a little into waterproof paint as an alternative.
Acrylic paint would be suitable, but would need a varnish over it as it has pours. It also is not that weather resilient but if sheltered this would be fine. Another option is simply exterior paint, like ones you would use on a house, which is definitely weather proof. It must also be considered what material will be painted onto.
http://www.chiff.com/a/acrylic-painting.htm
http://www.weathershield.ie/products/index.jsp
Waterproofing Electronics:
It is important that the electronic elements of this installation are protected against the weather. The Arduino would be located in the Lantern stand but it would be a good idea to have a waterproof case, available online. As for the wires there are plenty of water proof wires available online as well as a waterproof potentiometer. A water proof filler can then be used to seal any areas where water might get in.
 |
| Arduino Case |
 |
| Waterproof Wires |
http://www.ebay.com/bhp/clear-enclosure
http://www.alibaba.com/showroom/waterproof-electrical-wires.html
http://potentiometer.us/potentiometers/singleturn_potentiometer/waterproof.htm
For the LED Light strip it would be a simple matter of using waterproof LED Strip which is available online.
 |
| Waterproof LED Strip |
http://loweledlighting.ie/led-lighting/led-strip-bar-lighting/waterproof-5-metre-300-leds-strip-light-with-100-watt-dc-driver-ls-5swp-300-72d.html
http://www.ebay.com/bhp/white-led-light-strips-waterproof
Securing Map:
The map will be free standing, because of this we needed to look a securing this to the ground. Through the creation of the prototype I saw that 2 poles would not be enough and a third was needed in the middle for extra support. These poles would then have to be fixed into the ground. The first way I looked at how fences are succoured. One method was to use metal spikes that would be hammered into the ground.

The problem with this method is it is not that secure and depends on the looseness of the ground and how far down you put the spike. The second I looked at was using bolts to secure the posts.

This method would be good if we had to secure the map to a concrete surface as it does not require you to create holes through the ground. The final method and most secure is to embed the poles in concrete.
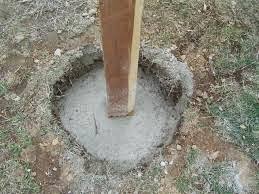
This would involve digging a hole, inserting the pole and filling the hole with cement and then covering.
http://www.landscapejuice.com/2007/08/how-to-concrete.html
http://www.diynot.com/pages/op/op003.php
http://www.perfectpergolas.co.uk/pergola-assembly/assembly-instructions-step-2
http://www.landscapejuice.com/2007/08/how-to-concrete.html
http://www.diynot.com/pages/op/op003.php
http://www.perfectpergolas.co.uk/pergola-assembly/assembly-instructions-step-2
I feel that despite us not actually creating this installation, we have researched enough into the materials and requirements that if we had the money to implement this we would be fully capable of doing so.
Geo textile bags are widely used in various industries for their durability and reliability. You can find high-quality geo textile bags in India that provide excellent protection for materials in harsh environments."
ReplyDeleteLet me know if you'd like any adjustments!